Thursday, December 31, 2020

Ink.Stamp. Share-New Year's Eve Blog Hop


You have just hopped here from Kim Price, didn't you love her project?
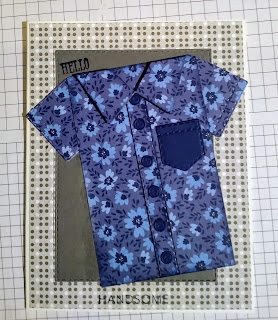
 I am going to be sharing a new suite called Well Suited, it is perfect for the men in your life.


I love this one, reminds me of my husband. Hello Handsome
I made the pocket smaller by cutting it down with the die.


I made a video using the presentation from OnStage. If you are an avid Stamper who can't wait for the next catalog then you should join so you can see all the new products before anyone else. There are so many perks to becoming a Demonstrator, the training and the sense of community in the Stampin Up family can't be beat. If you have questions about becoming part of the Stampin Up family send me an email or leave a comment. Sale a Bration is going to be one of the best times to join. You will get all the original products when you join plus 5 packs of 6 x 6 DSP. I also give my new downline a gift of a bundle from the catalog as a joining gift. 

Up next is Tricia Butts, click on the next button or any of the links under the roll call to see all the projects. Leave a comment on our blogs to let us know you like the new products and how we have used them. When you have completed the circle, come back and look at all the othere projects on our blogs by clicking on the right side of the blog 


Friday, December 25, 2020

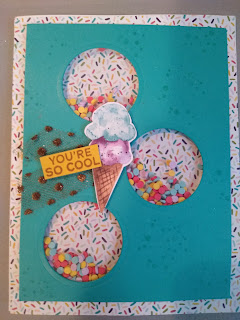
Ice Cream Corner Suite Shaker Card 1

When I got the new January-June Mini Catalog the first suite that caught my eye was the Ice Cream Corner Suite.


If you know me I love ice cream, my daughter and I are always on the lookout for a new ice cream place. So the Ice Cream Corner Suite is perfect for all of our adventures. We usually try to make Honey look like he is eating all the ice cream. Ha Ha...


I have a shaker card and video with a  fun tip on using the adhesive foam sheets to make the shape of your windows in the shaker cards.


I love this card, it was a sample in the new mini catalog and the video below shows you how to create the shapes for your windows using the adhesive foam sheets in the annual catalog. I found it easier than using the dimensional strips.


Check back soon for the video that shows how to make this fun card and 1 more shaker card that is so easy you will be making your own in no time.

If you would like to join me as a demonstrator, Sale a Bration is the perfect time. 

You get 5 packs of 6 x 6  in-color DSP for free and I will gift you with a bundle as my joining bonus. 

Product List


Saturday, December 12, 2020

December Special Blog Hop-Ink.Stamp.Share

 December Special Blog Hop-Ink.Stamp.Share


        Welcome to the Blog Hop! So Happy you are here!
I'm sure you enjoyed Annette Elias project.

To create the Ornament, I started off using left over pieces from a couple of my Online Card classes.
Then of course I had to keep adding and this is what I came up with. After I made the Ornament, I decided it need a roseete to add some stability to it. You know how it goes you start off with something in mind and it just takes on a life of its own.


You can't leave the back naked, so I added the mirror images of
the front.  I used the Poinsettia Place dies along with one of my favorite products the Forever Gold DSP. There are so many beautiful pieces in the package and I use so many of them in my projects.


On this Ornament I decided to use a combination of the thick whisper white cardstock and the DSP from the Wishes and Wonder suite. The darker gold pieces are from the Sunflowers dies. I had to add a pop of red with our Red Foil. It is so pretty.


Who remembers the rosette die that Stampin Up carried quite a while ago. I still have that die and I pulled it out to make a rosette for my ornament. If you would like to make your own rosette, use the 12 inch Designer series paper from the Wishes and Wonder suite. The embossing on one side and the beautiful images on the other is fantastic.  Start by cutting a piece of the DSP to the width you would like 3 or 4 inches is a great size then score your paper at ever 1/2 inch. You will need 2 of the 12 x 4 inch pieces scored at 1/2 inch. Then fold your rosette mountain/valley/mountain/valley all the way to the end. Then using your score and tape attach the ends. I have made a video to show you how to make this rosette, and the ornament. Hope you like it.


If you would like any of the products I used in these projects pop on over to my store.My hostess code is on the right side of my blog. 
I would love it if you sign up to get updates for my Blog and YouTube channel.
Leave me a comment and let me know what you think.
Thanks for stopping by, hop on to the next talented stamper Karen Egan
If you get lost there is a roll call, just click on the links below.


Friday, December 11, 2020

Snowflake Wishes Bundle Friendship and Christmas Tea

 I had made these cards with the Snowflake Wishes Bundle and neeed some quick gifts for friends.

There is a little store in Medina called Coffee Colony, and if you like the smell of coffee and tea it smells like heaven. They have the best selection of loose leaf teas and coffees around.

These are the gifts I made combining my favorite things.


The Snowflake Wishes bundle is retiring soon, don't miss out.  Pop over to my store and grab yours. While you are there the Clearance Rack has been updated and oh my what fun. 
You cant go wrong with a combination of Red and Crumb Cake, add a pop of gold and you're all set.

Pretty Peacock and White with the ribbon from Wonder of the Season is so beautiful. 
You can find it on my Stampin Up store, click the link.
Wonder of the Season Ribbon

And the Snowflake Wishes Bundle, click on the link.

Snowflake Wishes Bundle


Hope you like the projects and are inspired to use your products in a new way.

Take care,

Donna

Product List