December Special Blog Hop-Ink.Stamp.Share
Welcome to the Blog Hop! So Happy you are here!
I'm sure you enjoyed Annette Elias project.
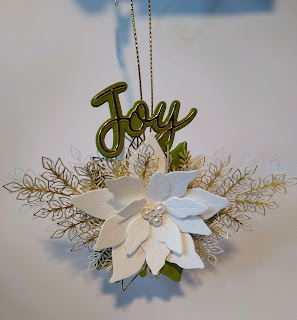
To create the Ornament, I started off using left over pieces from a couple of my Online Card classes.
Then of course I had to keep adding and this is what I came up with. After I made the Ornament, I decided it need a roseete to add some stability to it. You know how it goes you start off with something in mind and it just takes on a life of its own.
You can't leave the back naked, so I added the mirror images of
the front. I used the Poinsettia Place dies along with one of my favorite products the Forever Gold DSP. There are so many beautiful pieces in the package and I use so many of them in my projects.
Who remembers the rosette die that Stampin Up carried quite a while ago. I still have that die and I pulled it out to make a rosette for my ornament. If you would like to make your own rosette, use the 12 inch Designer series paper from the Wishes and Wonder suite. The embossing on one side and the beautiful images on the other is fantastic. Start by cutting a piece of the DSP to the width you would like 3 or 4 inches is a great size then score your paper at ever 1/2 inch. You will need 2 of the 12 x 4 inch pieces scored at 1/2 inch. Then fold your rosette mountain/valley/mountain/valley all the way to the end. Then using your score and tape attach the ends. I have made a video to show you how to make this rosette, and the ornament. Hope you like it.
If you would like any of the products I used in these projects pop on over to my store.My hostess code is on the right side of my blog.
I would love it if you sign up to get updates for my Blog and YouTube channel.
Leave me a comment and let me know what you think.
Thanks for stopping by, hop on to the next talented stamper Karen Egan
If you get lost there is a roll call, just click on the links below.
Roll Call
Karen Egan


Lovely idea, so pretty
ReplyDeleteKaren, thank you, you are so creative.
DeleteYou really got it goin on in these ornaments. They are so pretty & so fun for making. Thanks for the directions for the folded rosette ornament. Trying the folded process is on my want to try list & now with my creaser board it can be a reality. Love all of these. Also especially liked the design on the slim card in the hop. Great design that really flowed through the length of the card. I often do fussy cut of dsp & was very happy to see someone else using this technique. I use my small stampin up scissors & the cutting goes much faster than you may expect. Just remember to turn the paper not the scissors. This makes a smoother edge.
ReplyDeleteThank you Edee, I did have fun making these. I have always struggled with fussy cutting. Have fun hopping.
DeleteSuch a pretty ornament with so much detail.xx
ReplyDeleteThank you Stacey, everyone on this hop is so talented.
DeleteGorgeous ornaments.... so many beautiful details!!
ReplyDeleteThank you Annette, love your project.
DeleteSo pretty - I'm loving this project
ReplyDeleteBeautiful - I still have my rosette die as well, but more often than not I get out my scoreboard if I want to create a quick rosette.
ReplyDeleteLove your decorations. I have resisted this set so far but have a feeling I will give in next year!
ReplyDeleteGreat decorations :-)
ReplyDeleteStunning Donna, absolutely gorgeous, thanks for sharing and hopping x
ReplyDeleteGorgeous!
ReplyDelete